Photobucket


Showing posts with label easy. Show all posts

Wednesday, December 21, 2011

Gift Idea: Chocolate and Vanilla Dipped Oreos with Sprinkles

Here I am with a last minute bargain gift idea that is perfecto for your co-workers, neighbors, babysitter, local wine store clerk (what?), etc.  

They are beyond easy to make and I promise you that the recipients of this dipped cookie will devour them. I made a batch Monday night, brought them to work on Tuesday and they were literally gone by lunch time.  Here are the instructions:


You may notice the candy canes in the picture above. I attempted to dip candy canes, but every candy cane I unwrapped was broken so I ended up throwing them in the trash.  Just stick to the oreos. 

*Lay out large pieces of foil or wax paper before you start step 3


Now you have 2 choices.  

1. You can throw them into a Christmas tin and take them to work for everyone to eat out of (what I did). 

2. Or you can do what I've done in the past and throw a handful of the cookies into saran wrap and tie with a bow to give as gifts.  
via
I've seen people top their dipped oreos with crushed candy canes:
via
Or turn them into "oreo pops", which I think you need double stuffed oreos for:
via
The possibilities are endless!  Get to dipping and spreading that Christmas Cheer, y'all.  3 more days till Kris Kringle is here ... eeeeep!


It's the 9th day of Christmas over at Carissa Explains It All ... Go ENTER!! A large tote is up for grabs!
Pin It

Monday, December 5, 2011

Re-post: My DIY Christmas Card Display

How about a little festive DIY to get your week started off right?  Last year at this time I think I had less than 10 followers, so now that a few more of you are around these parts, I thought I would re-post this very easy DIY Christmas Card Display project. 

You can do this on any door in your house where you'd like to display your holiday cards. 

Recap of previous post:
I was sitting on my couch when my eyes kept catching the clutter of Christmas cards that had taken over my bar.  It wasn't long before I was off the couch and rounding up supplies for a little DIY project.

A few years ago I got a "Real Simple" book with everyday household solutions, which is what sparked my idea for this DIY project. One of the projects in the book suggested using double sided tape to hang ribbon on your refrigerator with mini clothespins to attach pictures, post cards, etc. to the ribbon.

I adapted this "ribbon on refrigerator" idea to hang cards from ribbon over the door to my laundry room. It was very easy to do and took all of 10 minutes. All you need is:
  • Festive ribbon
  • Hot glue gun 
  • Push pins
  • mini clothespins (Bought mine at Michaels or Hobby Lobby. Can't recall)
First, I cut the ribbon I was going to secure the cards on to the length I wanted, and then cut a shorter piece to use to tie bow.

Next, I hung the ribbon over the door using a push pin to secure the ribbon on the other side of the door. I tied my bow, and hot glued it to the top of the ribbon.

The last step is to take the mini clothespins and secure your holiday cards to the ribbon. Before you know it, you have a festive DIY card holder!

Here are pictures of each element (hopefully the pictures will help make more sense then my explanation):


There you have it!  If you have any questions about the instructions, let a girl know.
Pin It

Thursday, October 20, 2011

The BB's Green Chili Chicken Enchiladas

If there is one cuisine I know a thing or two about courtesy of my Texas roots, it's Mexican food.  And if we're being specific, I specialize in Tex-Mex.  Eating it of course.  But, sometimes cooking it too. 

I've even created my very own green chili chicken enchilada recipe that has received quite a few compliments in my day (OK, like one). Here she is:

Like what you see?  Then this is what you need to toss in your cart at the store to whip 'er up:

And for a side, the absolute best boxed Spanish rice I've had to date is Rice-A-Roni's whole grain Spanish variety:
I was prompted to make my enchiladas last week after Heather posted about "The Best Enchiladas Ever!"  I had every intent of trying her version out, but when I got to the store I realized I forgot to bring the list of ingredients.  I is smart. So plan B was to make mine because I already knew what I needed. 

Ingredients
1. One precooked rotisserie chicken from your local grocery store shredded
OR
1 lb chicken breasts shredded
2. 28 oz can green chili enchilada sauce
3. Two 4 oz cans chopped green chilies
4. 1/2 to 1 tsp minced garlic
5. 8oz Sour Cream
6. About 10 corn tortillas
7. 16 oz shredded Mexican cheese, reduced fat
8. Ground Cumin to taste
9. Chili Powder to taste
10. Salt & Pepper

Instructions:
1. Shred your chicken and season with salt, pepper, chili powder and ground cumin to your liking.
2. In large sauce pan combine enchilada sauce, chopped green chilies and minced garlic.  Bring to a simmer and reduce to low heat.
3. Whisk sour cream into sauce.

Now your ready to roll your enchiladas!

4. Spray a 9X12 glass casserole dish with non-stick cooking spray
5. Heat a large skillet over medium high heat.  Heat each tortilla about 15 seconds on each side
or heat in microwave wrapped in paper towels
6. Dip tortilla in sauce pan to coat both sides with sauce and place on a plate. 
7. Fill center of tortilla with chicken, top chicken with a spoonful of sauce and sprinkle a light amount of shredded cheese.
8. Roll tortilla around chicken and place "seam side" down in casserole dish.  Repeat until all chicken has been used.
9. Top your rolled enchiladas with remaining sauce and then top with remaining cheese.
10. Cover with foil and bake at 400 degrees for 30 minutes.  Remove foil and bake for an additional 5 minutes or until cheese is melted and sauce is bubbly on sides. 


Now that I type the instructions out, it actually sounds more complicated than it really is.  The most time consuming task is rolling your enchiladas, and once you get the hang of it, you'll be done before an episode of E! News ends (God Bless Guiliana. Love her).  If you have any questions at all, feel free to ask.   Maybe I'll answer.

p.s. If you use reduced fat cheese and sour cream, these are low cal. 

p.p.s. Who wants to come over to my new house to help me paint and unpack?  I'm majorly slacking and you're going to have to continue to listen to me whine about it until I'm done.  I promise to make these enchiladas, we'll watch trash TV and guzzle wine. 

Pin It

Thursday, July 28, 2011

Outside the box affordable storage ideas

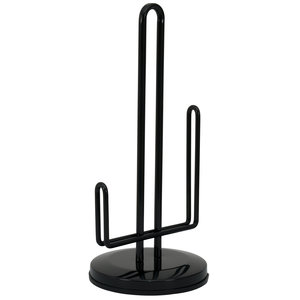
How creative is this paper towel turned bracelet holder?  I would have never thought of this, so I'm glad someone else did.  What a fun and easy way to display your bracelets on your bathroom counter or dresser.  I'm totally stealing this idea.
via, but I first saw on Sierra's blog!
Similar paper towel holder from Bed, Bath & Beyond for $9.99:
via
I like this option from Wal-Mart too.  Only $5.97:
via

This is an Ikea plastic bag dispenser for $1.99 ...
via
... that I attached to the cabinet door under the sink next to my toilet (yummy) to use as an extra toilet paper holder.  It's so convienent, you have no idea.
Here's something for your kitchen.  Uhhh, genius!  And the rail holding the lids is only $1.99 from Ikea.  Say no more.  I'm sold.
via
 You could totally hang necklaces or earrings from this rail too, I've seen it done before:
via
And last but not least, a straw dispenser turned ribbon holder.   I need.
via

All you need is an old fashioned straw dispenser.  Here's one from Bed Bath and Beyond for $14.99.  As always, be sure to use a 20% off coupon.  I have a huge stash of their coupons in my car so that I always have some handy at all times.  God forbid I'm without a BBB coupon.
via

It's official, I'm doing some organizing this weekend now.  
I'll be starting my adventure off at Ikea. 
Sooo ... ummm ... Mom, can I borrow your check card by chance?
And I may need to do a little shopping at Bed, Bath and Beyond too. 
And possibly Target. 
And most likely Wal-Mart. 
Cool? 
After all, my birthday is only a few weeks away. 
Wink.

What are your outside the box organizing solutions? 
[P.S. For any fairly new readers of my bloggity blog, I posted a lot of my bargain organization a while back.  Be sure to check out my "Tidy" section if you're interested in my make-up, nail polish, Tupperware, travel and closet organization ideas on the chiz-eap.]
Pin It

Monday, July 18, 2011

Blender, oh how I've missed you

Back in the day I used to whip up a mean smoothie.  Then I went off to college and somehow my blender didn't make it past Freshman year in the dorms.  Poor thing. 

Since then I've been blender-less and I didn't realize how much I missed having one until I bought one on Friday at Target.  I actually went to Target to buy this, which I will tell you about later this week. It's going to change your life!

Once I scooped up the above item, I was making my usual rounds to the beauty aisles before checking out when I stumbled across this little display:

Not just any blender.  It was pink and on sale for $17.99.  Need I say more?  This little lady made her way into my cart and I put her to use this weekend by making Strawberry Banana Smoothies for the nephew and I on Sunday while babysitting.

But before smoothies, Aunt Lindsey whipped up a Cafe Mocha and Reese had waffles.  All right ... I might have had a waffle too. 
 
 The smoothie was perfect for a hot summer Sunday.

Ingredients:
1 cup ice cubes, crushed
10 oz fresh strawberries, stems removed
2 bananas
1 to 2 tbsp of honey or a splash of OJ for added sweetness
3/4 cup milk

Crush the ice in the blender first then add the rest of the ingredients and blend until smooth.  Ta-da!  Fresh fruit smoothie for a low cal and refreshing treat. 

If you too are blender-less, go get yo'self a pink blender at Target!  It'll be the best $18 you'll ever spend.  What's your favorite thing to make in the blender?  Is there anything I must try?  I'm going to make Crystal Light Margs next.
Pin It

Thursday, June 16, 2011

"No heels allowed" Happy Hour

I don't know about you ladies, but in between the hussle and bussle of the "real world", it can be challenging to make time to see your girlfriends.  I miss college where we were always at the same places all the time, don't you?

The best way I've found to stay in touch is by meeting up for a quick happy hour after work to catch up on the latest gossip and share a few laughs. Unfortunately, those drinks and apps can put a dent in your checking account.  Mamma no likey.

My solution?  Switch off hosting a "No Heels Allowed" Happy Hour at your homes w/ your best ladies!  Tell them just to bring themselves after work and kick off their heels at your place.


ON THE MENU

BOOZE aka "The Sweet Nectar"
Serve your own Skinnygirl Margarita in a fun martini or margarita glass over ice garnished with fresh cut limes (salt the rim if you want):
  • 2 ounce(s) clear Tequila (Sauza or clear premium tequila)
  • A splash of fresh lime juice
  • A splash of Cointreau, Grand Marnier or Triple Sec


or

Serve a girly spritzer with fresh fruit:
  • two parts white wine,
  • one part cranberry juice
  • one part ginger ale
  • fresh fruit of your choice

    Since we're less than a week away from it OFFICIALLY being summer and a 2 piece and I are STILL not getting along, may I suggest these low cal apps to pair with the above cocktails:

    MUNCHIES:

    Skinny Taco Dip (w/ Skinnygirl Marg)
    Click here for the recipe via Gia's Skinny Taste blog.  Seriously, go check her blog out if you are looking to cook healthy.  She has so many amazing, low-cal recipes that I don't even know what to make first.
    or

    Click here for the recipe via Gia's Skinny Taste blog. 

    The only other thing you need is some jams. My top 5 favorite summer songs right now:
    • "The Lazy Song" by Bruno Mars (my life anthem)
    • "Last Friday Night" by Katy Perry (= me every weekend)
    • "On the Floor" Jennifer Lopez ft. Pitbull
    • "Honey Bee" by my love, Blake Shelton
    • "Rolling in the Deep" by Adele
      There you have it ... the ingredients to host your very own "No Heels Happy Hour" with your besties. 

      Send out an email on Monday, find a day that works for everyone and let the party begin.  Just make sure you are switching off so not one person is always footing the bill.

      So what do you think?  Is this something you would do with your girls?
      Pin It

      Wednesday, June 8, 2011

      How-to: Easy fake lash application

      Before I get to the main event, I had to show my chi curled baby poof.  I watched Pink Lou Lou's "how-to poof" instructional "booze bag" video (Her sis calling her a booze bag in the vid was my fave part)  last night.  You may not know this, but PLL is THE best hair poofer this side of the Mason-Dixon line ... just a little FYI.

      So this is my attempt at recreating her magical poof. Mine is a baby poof.
       What's with my hand looking like a creeper claw?
      OK, enough about my sucky poof skills, In yesterday's post I said I would try to put together a step-by-step "how-to" for my false lash application trick if i could figure out how to explain it.  Well, I'm still not sure I've figured it out, but here's my best effort.  You can't say I didn't try.

      You need these three things: lash strips, lash glue and tweezers.
      Please excuse my haggard MAC lashes, they have been used and abused.  They're just a prop.
      Before you do anything, apply your eye make-up as your normally would including eyeliner and mascara if you wear it.  Read about my eyeliner obsession here and my fave mascara here.

      So once you've applied your make-up and are looking gorge, follow these steps:

      1. Put a generous dab of eye lash glue on the back of your hand. 

      2. This next step may sound weird, but just go with it ...
      3. Transfer the glue from the tube to the lash line.

      4. Wait about 30 seconds for the glue to become tacky. 

      Use tweezers to apply the lashes to your natural lash line, getting as close to the base as possible.  Tweezers make it much easier to manage the placement of the lashes as opposed to trying to use your fingers.
      Do as I say, not as i do.  I had already washed my face when I remembered i was going to do this how-to for y'all. 
      You want your make-up done before applying lashes. 
      5. Use your fingers to press and hold the lashes in place until they are completely dry.  
      Here's the finished product.


      (I'm wearing MAC lashes in this pic because this was taken 
      prior to me discovering the bomb $1 elf natural lashes.)

      [SOME FINAL WORDS OF BLONDE WISDOM]
      • If this is your first time ever wearing lashes you should know they are going to feel weird when you first put them on, but you'll get used to it and it's totally normal.  Just trust me.
      • To remove the lashes, use a warm wet wash cloth.   Let's be honest here ... I'm normally stumbling into my bathroom after a night out, seeing double and just rip those hoes off.  Totally kidding No I'm not.
      • I've come to the conclusion that I  have larger than normal eyes.  Lash strips are never long enough for my eyes,  but a lot of people have to cut their falsies down to fit their eyes.  If you are one of those people, just cut them to fit.
      It's time!  Get to glamming your eyes up ladies!  I wanna see pics of your lush lashes if you try this how-to.  I hope it helps.  Do you have any additional tips I didn't cover?
      Pin It

      Thursday, May 26, 2011

      DIY Skin Salt Scrub!

      A few days ago I was perusing Lauren Conrad's new beauty Web site that covers all kinds of "hair+makeup how-to’s, nail trends, skin issues, tools, current obsessions & inspirations, as well as countless quick tips" and I came across an easy, homemade salt scrub that claimed to bring your dull skin back to life.

      What really got my attention was that the scrub ingredients were common items you probably already have in your kitchen.  Easy + cheap = you got me Lauren.  I had to give it a try & I am LOVING how soft and exfoliated my skin feels.   Obviously, I had to share with you girls immediately.  The whole scrub cost me only about $1.25, so you better believe this is going to become a weekly or monthly ritual.

      All you need are these 3 ingredients:
      • 5 tbsps sea salt
      • 1 tbsp olive oil
      • one lemon
      Time to "mix and mash":
      Measure 5 tbsp of sea salt and pour into a cereal sized bowl.
      Add 1 tbsp oil to the salt.  Once the salt gets coated by the oil, the lemon won’t dissolve it.

      Mix together.
      Squeeze the juice of one lemon.  Remove any seeds that get in the scrub mix.
      Ta-Da!  Here's how it looks when you're done.
      Scrub away (except not your face)!
      Seriously, I'm really impressed.  Now I want to find homemade face masks and hair treatments.  I'll keep you posted if I find any other cheap DIY beauty treatments worth sharing.

      Enjoy your silky summer ready skin!
      Pin It

      Tuesday, May 10, 2011

      How I Chi curl my hair [video]

      This vloging stuff is for the birds.  I don't know how those beauty vlog gurus do it.  I didn't even get to talk to y'all and be my normal, witty self.  I was too worried trying to explain how I do the Chi curl, which I'm almost 99 percent sure is probably still pretty unclear after you watch this.

      I really hope this video makes a little bit of sense to you because it is way harder than I ever thought to explain.  If not, at least I tried, and you'll have something to laugh at.  Feel free to show your friends and make fun.  I had to ghetto rig my little point and click Canon digital camera in my living room. 

      This is simply the basic idea behind what I do to Chi curl my hair, please don't watch this video expecting some legit hair tutorial. 

      Of course, I will be happy to answer any questions you have, just make sure your e-mail address is connected to your google profile or leave it with your comment.  Here goes nothing, don't mind my double chin.  It brings all the boys to the yard.


      And p.s. It took me all night to upload this, I am never doing a vlog again.
      Pin It

      Tuesday, April 26, 2011

      DIY Makeup Brush Cleaning

        
      [via]
      Let's talk DIY makeup brush cleaner, shall we? I’m sure most of you probably already know this, but maybe not. Legit makeup brush cleaners can get pricey, and cleaning your makeup brushes frequently is a necessity. I know it’s sick, but they harbor dirt, bacteria and skin oil. Barf. If you don’t keep them clean, they can lead to break-outs and a clumpy application. I know you don’t want that. Right?

      A few years ago I bought a bottle of brush cleaner from Ulta and it was over $20 (what was I thinking?), so I looked on their Web site and these days Ulta's brush cleaners range from $11 to $30. I’m pretty sure you know I’m not paying $30 when I have a DIY system that will cost you less than $4. My bargain solution? Baby shampoo.

      It’s gentle and will keep your brushes lasting for years, which is a great investment if I do say so myself. Look, I’m as lazy as the next girl, but the thought of spreading bacteria all over my skin makes me shiver. Here is my easy step-by-step guide to keeping your brushes soft and squeaky clean:

      1. Run your brush under warm water

      2. Work a small amount of baby shampoo into a lather

      3. Rinse thoroughly and repeat as needed until water runs clear from brush. Try to keep your brush pointed down during this process.

      4. Reshape and allow to dry on a clean towel.

      [Do this process a minimum of once a week to all your brushes. Technically any liquid make-up brushes should be cleaned every day (um, yah right) and powder brushes can go a little longer between cleaning.]

      Hope this helps. If you have any questions or additional tips, I'd love to hear them in the comments!
      Pin It

      Tuesday, February 22, 2011

      Spray paint makeover

      Happy (fake) Monday!  I was off work yesterday for President's Day, so today feels like a Monday to me.   I love a short work week, but find me someone who doesn't.

      This weekend I finally tackled a project I've been putting off for over a year.   I had a small white shelving unit I used as a night stand in college.  When I moved to my current apartment over a year ago, I needed an entryway table, so I decided to use it as such instead of spending money on something new.  There was one slight problem.  The unit was white, and the color scheme in my living room/dining room area is deep brown and red. 


      I always knew I was going to spray paint it (it's not real wood) a deep brown, but I wasn't sure exactly what color to use, what kind of spray paint to use and I needed the temperature outside to be right.

      I did some Google research and determined the spray paint I should use is Krylon Fusion (a little less than $5 a can). I made a stop at Wal-Mart on Saturday and during my nephew's afternoon nap, I got to work.  I cleaned the shelving unit, put it on a tarp on my balcony and started spraying.  After about 30 minutes of dry time, I moved my madeover entryway table back inside and I think the brown looks lovely.  Now I need to do some antique shopping to find some fun treasures to decorate the shelves with.  What do you think of the finished spray paint project?   


      Pin It